Purpose: Inventory adjustments are crucial for maintaining accurate records in a warehouse management system (WMS). They address discrepancies between the recorded inventory counts and the actual physical inventory counts.
These discrepancies might arise due to various reasons, such as:
– Damages: Products that are damaged in storage or transit and are no longer sellable.
– Human Errors: Mistakes made during the counting process or data entry.
– Theft: Loss of inventory due to theft or pilferage.
– Misplacement: Items that are misplaced and not where they are recorded to be.
– System Errors: Issues in the inventory management system that lead to incorrect data.
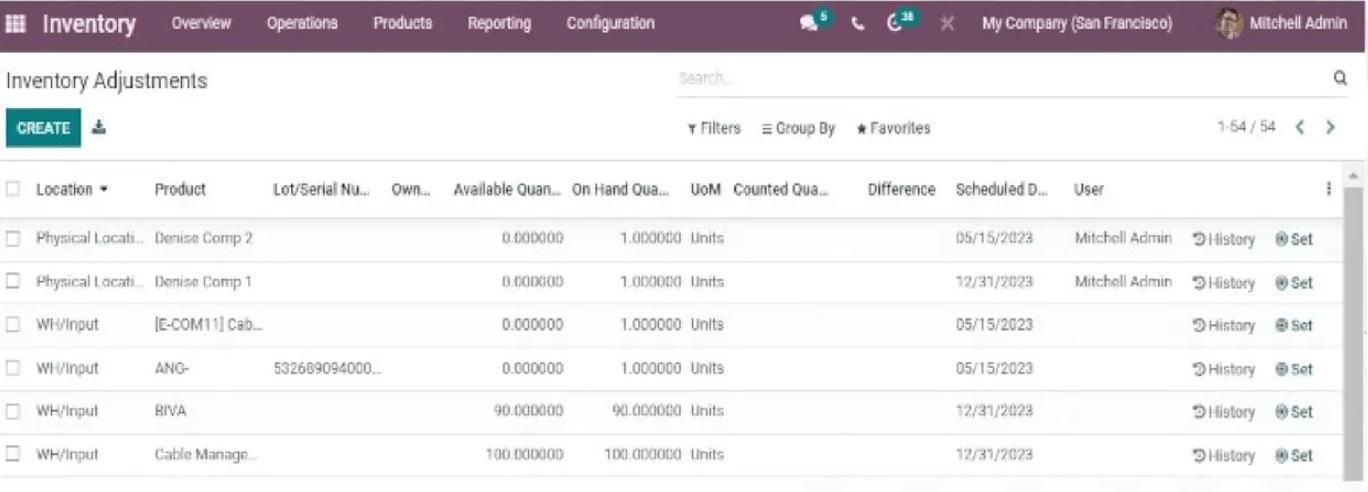
Step 1: To view the Inventory Adjustments page, navigate to Inventory app Operations Inventory Adjustments.

Step 2: Guide for Creating a New Inventory Adjustment
- Navigate to Inventory Adjustments Page:
- Go to the Inventory Adjustments section in your warehouse management system.
- Initiate a New Adjustment:
- Click the Create button on the Inventory Adjustments page. This action will generate a new, blank inventory adjustment line at the bottom of the page.
- Select a Product:
- On the blank inventory adjustment line, locate the Product column.
- Click the drop-down menu under this column to display a list of available products.
- Choose the appropriate product from the list.
- Choose Lot/Serial Number (if applicable):
- If the selected product is tracked using lots or serial numbers, the system will prompt you to specify the lot or serial number.
- Click the drop-down menu under the Lot/Serial Number column.
- Select the relevant lot or serial number from the list.
- Enter Counted Quantity:
- In the Counted Quantity column of the inventory adjustment line, input the quantity of the selected product that was counted during the inventory adjustment process.
- Review and Confirm:
- Double-check
- Ensure
- Finalize the Adjustment:
- So this process helps reconcile the recorded inventory with the actual physical
Step 3: To the right of the Counted Quantity column, the Scheduled Date and User can also be changed via their respective drop-down menus. Changing the Scheduled Date changes the date that the inventory adjustment should be processed on, and selecting a responsible User assigns a user to the specific inventory adjustment (for traceability purposes).
Once all changes have been made to the new inventory adjustment line, click away from the line. Doing so saves the adjustment, and moves the line to the top of the page.

1 Counted Quantity Greater than On Hand Quantity:
- The Difference column value will appear in green.
2 Counted Quantity Less than On Hand Quantity:
- The Difference column value will appear in red.
3 Quantities Match and Have Not Been Changed:
- The Difference column will be blank, indicating no
Benefits of Cycle Counting:
- Accuracy: Regular counts help identify discrepancies between physical inventory and records more quickly, improving inventory accuracy.
- Reduced Disruption: Since counting is done in smaller, manageable sections, it minimizes the disruption to daily operations compared to a full inventory count.
- Improved Data: Frequent counting helps in catching and correcting errors more promptly, leading to better data quality and decision-making.
- Cost-Efficiency: Reduces the need for large-scale inventory audits, saving time and resources.
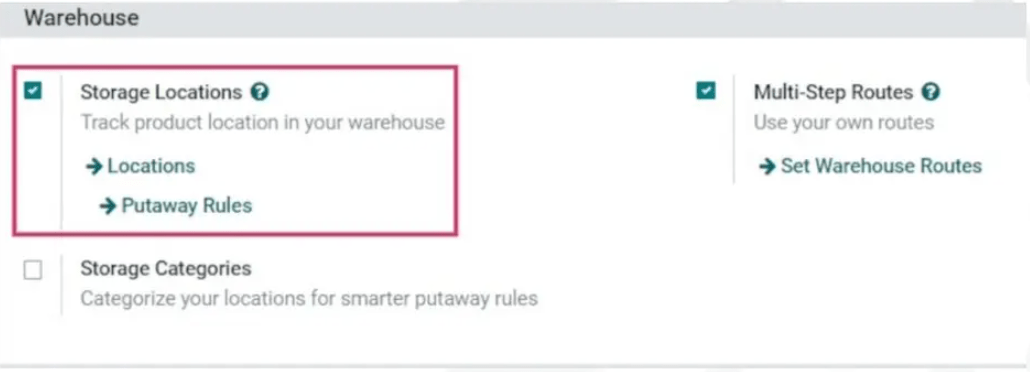
To enable the Storage Locations feature in Odoo for location-based cycle counts, follow these steps:
- Navigate to the Inventory App:
- Open the Inventory app from the main dashboard.
- Access Configuration Settings:
- Go to the Configuration menu.
- Select Settings from the dropdown.
- Enable Storage Locations:
- Scroll down to the Warehouse section.
- Find the Storage Locations option.
- Click the checkbox next to Storage Locations to enable it.
- Save Changes:
- Click the Save button at the top or bottom of the page to apply the changes.
By enabling this feature, you’ll be able to perform cycle counts based on specific storage locations within your warehouse

To manage and modify locations within your Inventory app, follow these steps:
- Navigate to the Locations Page:
- Open your Inventory app.
- Go to the Configuration section.
- Select Locations. This action will display the Locations page, which lists all the locations currently set up in the warehouse.
- View Location Details:
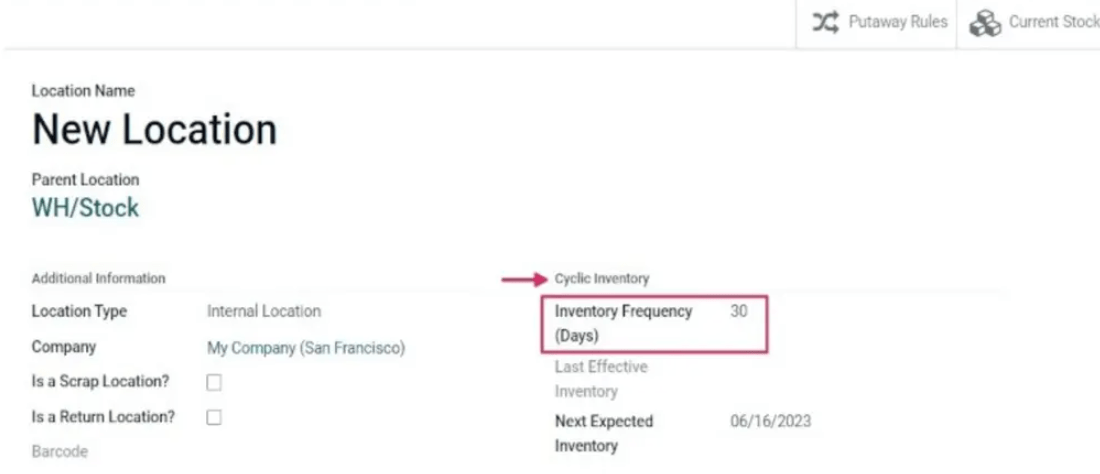
- Find and click on the specific location you want to view or edit. This will open the settings and configuration page for that location.
- Edit Location Settings:
- On the location’s settings page, look for an Edit button or option. Click on it to enable editing.
- Make the necessary changes to the location’s settings.
- Save Changes:
- After making the edits, ensure you save the changes by clicking on the Save button.

To view all products within a specific location in your Inventory app, follow these steps:
- Access the Products View:
- Open your Inventory app and navigate to the section where you can view products.
- Group Products by Location:
- Click on the Group By option.
- From the dropdown menu, select Add Custom Group. This action will open a new dropdown menu to the right.
- Select Location:
- In the new dropdown menu, choose Location.
- Click Apply.
- View and Manage Products:
- The page will now display a list of condensed dropdown menus, each representing a location with products in stock.
- You can now perform actions such as cycle counts for all products in the selected location.
This method helps you efficiently manage and audit inventory based on specific locations within your warehouse.


